Status Levels - Auto Assigning Levels
One special use that you may find helpful is to automatically set an alternate status level if a trip has been changed after it has been dispatched—so you don’t blow a ride by forgetting to tell the chauffeur that things have changed.
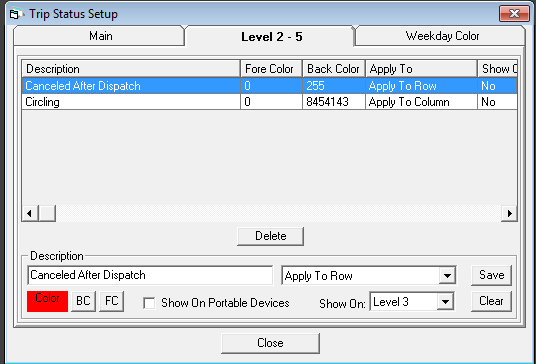
Begin by creating a status level 2-5 and naming it “Changed after Dispatch” or something like that. We recommend making the status color “Apply to Row” rather than just to the column, so it becomes very clear on the dispatch grid that the status level has been set. Please note that you must also set this status to “Show On” a specific level (meaning it is available only for that status level)—it cannot be set to “All”. (If it were set to “All”, then the system wouldn’t know what status level to change.)
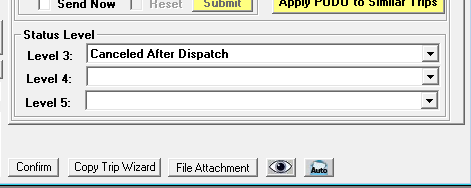
An example of the status after it has been set up is below. Note that we picked Status Level 3 for our indicator—you can pick anything from 2 through 5.
Begin by creating a status level 2-5 and naming it “Changed after Dispatch” or something like that. We recommend making the status color “Apply to Row” rather than just to the column, so it becomes very clear on the dispatch grid that the status level has been set. Please note that you must also set this status to “Show On” a specific level (meaning it is available only for that status level)—it cannot be set to “All”. (If it were set to “All”, then the system wouldn’t know what status level to change.)
An example of the status after it has been set up is below. Note that we picked Status Level 3 for our indicator—you can pick anything from 2 through 5.
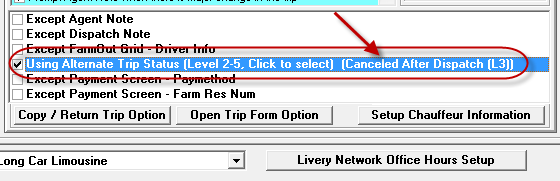
Now, navigate to “System Default Config” in Maintenance and select the Default 2 tab. Find the line that says “Change TripStatus back to Assigned if there are any major changes” and check the box to the left of the statement .
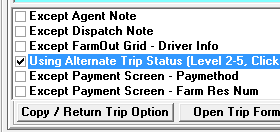
Notice that when you select the line, it populates a window at the bottom of the screen with some choices. The choice we are looking is the third one down…”Using Alternate Trip Status Level 2-5, Click to Select”.
Notice that when you select the line, it populates a window at the bottom of the screen with some choices. The choice we are looking is the third one down…”Using Alternate Trip Status Level 2-5, Click to Select”.
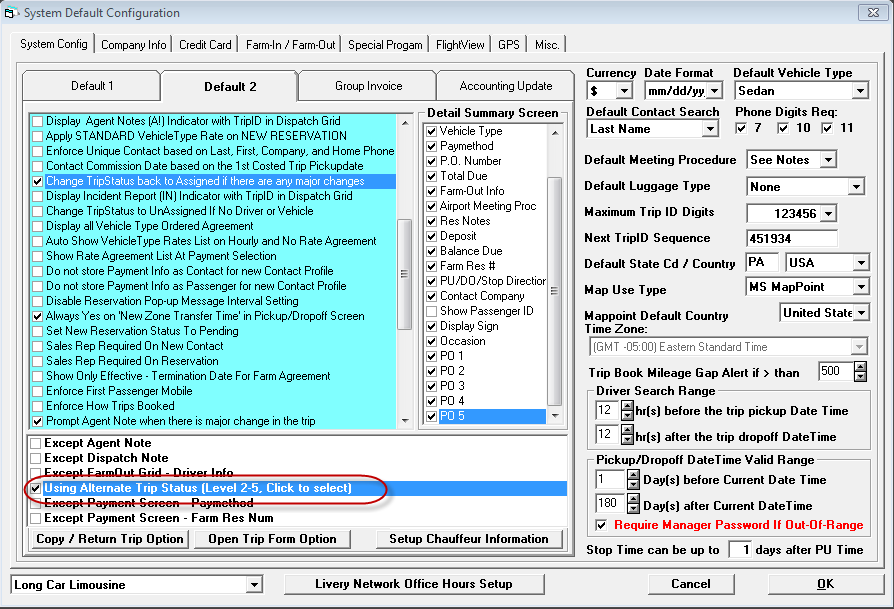
When you click on the box to the left of that text, a new window will open showing your choices. In our example, we only have one additional Level set up, so we will choose it.
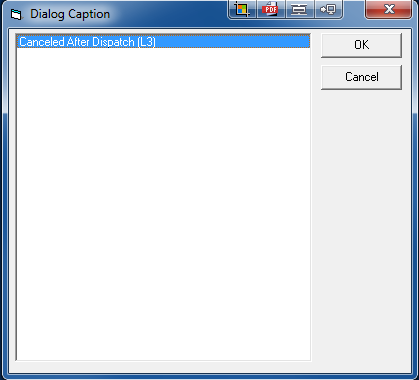
Once you pick the one you want and click ok, the screen will show you confirmation of what is set. (Note that this text will not stay there when you leave the screen…but it will stay set.)
Now, when you make a change to a trip, the status level will automatically change when you save the trip, and be highlighted on the dispatch grid.
|

|
Note: If you want certain changes NOT to set off this trigger (such as Agent Notes, Dispatch Notes, FarmOut Driver Info, and Payment changes…simply check the appropriate blocks).