Dispatch Grid - Tips & Tricks
For those of you who use the dispatch grid, here are a few tips to help you get it running faster and more smoothly.

First of all, if you are using a date range at the bottom of the dispatch grid, under most cases you should have “Display All Trip(s)” NOT checked.
The way the system works is that it filters the grid to only show trips within the date range…but if that box is checked, then the system ALSO has to look throughout all the current trips to see if there are any trips earlier than the date range that are not yet marked done. (Typically this would be used if you don’t have overnight dispatch—the early morning dispatcher would come in and see all of last night’s late trips still in progress and need to mark them done). Unchecking this box makes the system a lot faster for everyone—so everyone should make sure this is unchecked unless you need it…and when you are done, uncheck it again.
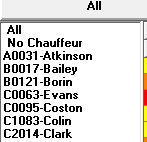
While we’re looking down there, the next box over says “Show Chauffeurs”. If that is checked, a window opens up on the left of the screen, pushing the dispatch grid over to the right—and you will see a list of all chauffeurs who have at least one trip during the date range you selected. (Note that if a chauffeur has no trips, his/her name will not appear). When you click on the chauffeur’s name, all that chauffeur’s trips will appear in the grid. (Note that you can also click on “All” or “No Chauffeur”—No Chauffeur shows you only the trips that still need assignment.
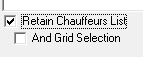
Please note that if you have a chauffeur selected and the screen refreshes, either automatically or when you click Refresh, you will lose your chauffeur selection…UNLESS you have “Retain Chauffeurs List” checked at the bottom.
When that box is checked, then refresh will not blow your selection. (Note that if you change the date range, it does reset, since the list of chauffeurs could be different).
Also note the “And Grid Selection” box below, which can only be checked when Retain Chauffeurs List is checked. When this button is checked, and you have scrolled down the dispatch grid (if, for example, a chauffeur has a lot of trips), when you switch to another chauffeur, the grid won’t reset to the top (if the new chauffeur you selected also has a lot of trips).
Now we’ll talk about how to control how you see done and canceled trips on the dispatch grid.
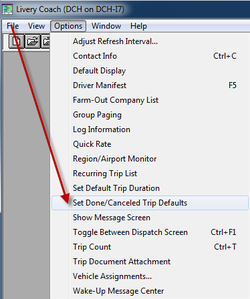
To access the control, open the dispatch grid and then select Options…Set Done/Canceled Trip Defaults from the drop-down menu.
When selected, you will see the following menu:
Let’s talk about the different settings and what they do.

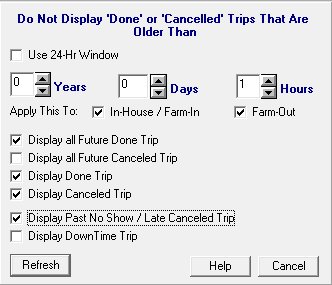
First of all, the settings apply in conjunction with the “Display Done Trip” and “Display Canceled Trip” check boxes. In this example, all trips marked Done or Canceled will be displayed on the dispatch grid for 1 Hour after the scheduled end of the trip.
Note that the calculation is made from the scheduled end of the trip, not when you actually change the status to “Done”. If you have your grid to display Done trips for an hour, and you have a trip scheduled to end at 10am, mark it Done at 10:15 but don’t change the end time, it will disappear from your dispatch grid at 11am.
The “Use 24-hour window” check box at the top is only relevant when you have something in the Days box. If you have “1 Days” set, without the box checked, it will show Done trips from all of yesterday as well as today; if “Use 24-Hr Window” is checked, then it will show trips marked Done over a rolling 24 hours back from the current time.
The “Display all Future Done Trip” and “Display all Future Canceled Trip” check boxes will cause trips that are marked Done or Canceled to display if the scheduled end time is later than the current time.
Note that if you have odd combinations of settings, you can get odd combinations of results. For example, suppose you choose to display FUTURE done trips, but not Done trips.
Now you have a trip scheduled to be complete at 10:30am, but it’s done a bit early, and you mark it done at 10:25. It will appear on your dispatch grid for 5 minutes (until 10:30), and then disappear.
Now imagine the opposite settings…you are displaying Done trips (for, say, 1 Hr) but not Future done trips. Now when you mark that same trip Done, it will disappear (since it is a future done trip), but then reappear at 10:30 (since now it is no longer “in the future”)
Our recommended settings are to always display Future Done Trips, and also Done trips for 1 Hour, but feel free to change the settings as you see fit—just remember the cautions.

The bottom two check boxes should be self-explanatory…Display Past No-Show/Late Canceled Trip makes them behave like Done trips (which is generally what you would want). And Display DownTime trips shows you Down Time trips).
Finally, even if you decide as a general rule NOT to show canceled trips (since often they just get in the way), there is a checkbox at the bottom of the Dispatch Grid where you choose to display them anyway…a handy quick way to take a peek at the Canceled trips and then make them disappear again.
Finally, even if you decide as a general rule NOT to show canceled trips (since often they just get in the way), there is a checkbox at the bottom of the Dispatch Grid where you choose to display them anyway…a handy quick way to take a peek at the Canceled trips and then make them disappear again.